Configuratorno tools needed
Browse all sixteen planes, inspect the real Karabiner output of any key, rename the applications behind the yellow keys, and export a ready-to-import JSON file.
This is the multi-page printable view of this section. .
Capslock turns Caps Lock into a second keyboard layer on macOS. Three ideas explain everything else:
⇪ H J K L move the cursor, ⇪ N deletes a
word, ⇪ E opens Safari.⇪ H moves left, ⇪ ⌘ H selects left, ⇪ ⌥ H moves the mouse
left.New to Capslock? Start with Install and first run, then keep Default layout open while you learn.
Install Capslock, finish the short onboarding, and learn the default layout in the app's own Playground. If you used the Karabiner-Elements configuration before, read the Karabiner page before you start.
There is no public download yet; see Download. This page describes the signed release.
Open Capslock.dmg and drag Capslock into Applications. Then open it from
Applications or Spotlight.
Capslock runs as an ordinary app with a window, a Dock icon, and a menu-bar icon. Closing the window keeps it running in the menu bar.
On the first launch Capslock takes over nothing. The keyboard keeps working as before until you finish onboarding.
Home shows Running and "Caps Lock is your Hyper key." Its status card should read:
| Row | Healthy value |
|---|---|
| Keyboard access | Granted |
| Hyper key | Caps Lock is ready |
| Conflicts | None |
| Recovery | None needed |
Then try the four gestures from First steps on Home:
If a row is not healthy, its link opens Diagnostics, where every check has numbered steps and buttons that fix it.
Nobody memorizes 357 bindings up front. Capslock teaches the layout in three ways: it shows the current plane when you pause, it can show each action as it runs, and the Playground has short lessons that follow your own mappings.
Hold Caps Lock without pressing another key. After a short delay the current plane appears on screen as a full keyboard with every action written on its key. Press ⌘, ⌥, ⌃ or ⇧ to switch planes while it is open; release Caps Lock to close it.
It is on by default. In Settings › Hyper you can turn it off, change the delay (550 ms by default, 250 to 1500 ms), and choose whether it hides when an action runs or only when you release Caps Lock.
Settings › Hyper › Show actions on screen displays a small caption at the bottom of the screen each time a chord runs: the keys you pressed and the action they produced. It is off by default; the caption stays for 1.35 seconds unless you change the duration.
The Playground page has three parts, chosen under Lesson:
⇪ Esc to toggle Caps Lock, and ⇪ Space to switch input
source.⇪ H, ⇪ J, ⇪ K and ⇪ L.Lessons read your current mappings. If you changed or disabled a key a lesson uses, the lesson says so instead of asking for a key that no longer does what it describes.
The Mode switch chooses between Live, where chords really run, and Safe Practice. In Safe Practice, actions with side effects are previewed instead of run: opening apps, Shell commands, sleep, clipboard slots, and toggling Caps Lock. Keystrokes and mouse actions still run, so you can see the cursor move.
Safe Practice turns itself off when you leave the Playground, hide the window, or switch to another app.
Free Play keeps only the most recent key, only while the Playground is in front, and clears it when you leave. Nothing you type is recorded.
The Keyboard page draws your keyboard with each key's action on it. Choose a plane from the menu or with the ⌘ ⌥ ⌃ ⇧ toggles. While you hold Caps Lock, the drawing follows the plane you are actually on and shows a Live badge. Key legends follow your active keyboard layout, so Dvorak or AZERTY users see their own letters. Click a key to see or change it; see Keyboard editor.
Capslock needs Caps Lock and the F18 key to itself. It never edits, disables, or uninstalls Karabiner-Elements or any other tool. When something else already uses those keys, Capslock refuses to start and tells you what to change.
Karabiner-Elements can keep running for everything else. Only rules on Caps Lock and F18 conflict.
Diagnostics has an Open Karabiner-Elements button for step 1. Capslock checks again every time you switch back to it, so a conflict that appears later stops Capslock and gives Caps Lock back rather than leaving two tools fighting over it.
The native app ships the same Capslock Classic layout, so you do not need to bring anything across to keep the bindings you know. A few things work differently:
⇪ Space sends ⌃Space for switching input
source.~/.clip6 from the Karabiner setup are not read.open -a in a shell.When you are ready, turn off the Capslock rules in Karabiner-Elements as described above, then start Capslock. The Karabiner configuration itself stays documented in the Karabiner Edition if you want to go back.
A fresh install starts with the complete Capslock Classic V3 layout: 357 bindings, one for tapping Caps Lock and 356 for holding it with another key. Nothing has to be configured before it works. These pages list every binding. In the app, the Keyboard page shows the same layout, one plane at a time, and Hold-to-Reveal shows it while you type.
⇪ means "hold Caps Lock". ⇪ H is: hold Caps Lock, press H. ⇪ ⌘ H is:
hold Caps Lock and Command, press H. Modifier glyphs follow the macOS order:
⌃ Control, ⌥ Option, ⇧ Shift, ⌘ Command.
In the default Classic Hyper mode only the left Command, Option, Control and Shift choose a plane. The right-side ones are what Capslock itself holds down for other apps; see Hyper mode.
| Press | What happens |
|---|---|
| Tap Caps Lock | Escape, sent when you release the key |
| Hold Caps Lock | The Hyper layer: the keys below take on their mapped actions |
⇪ Esc | Turns real Caps Lock on or off |
⇪ Space | Sends ⌃Space, the macOS shortcut for switching input sources |
⇪ ⌘ Space | Sends ⌃⌘Space, which opens Emoji & Symbols |
A tap counts only if you release Caps Lock within one second and press no other key, mouse button, or scroll wheel in between. Modifiers you already hold travel with the Escape: hold Shift and tap Caps Lock to send ⇧Esc.
When real Caps Lock is switched on, every chord except ⇪ Esc types its
ordinary key. Press ⇪ Esc to switch Caps Lock off again.
The modifiers you hold with Caps Lock choose one of sixteen planes. Each modifier is a bit (Command 1, Option 2, Control 4, Shift 8), and the plane number is their sum. Matching is exact: a chord with an extra modifier never falls back to a plane with fewer.
| Plane | Hold with ⇪ | Name in the app | Default bindings |
|---|---|---|---|
| P0 | nothing | Navigation & Actions · Base | 88 |
| P1 | ⌘ | Selection & Quick Actions · Command | 64 |
| P2 | ⌥ | Mouse & Apps · Option | 43 |
| P3 | ⌥⌘ | Extended Selection · Command + Option | 13 |
| P4 | ⌃ | Windows & Spaces · Control | 17 |
| P8 | ⇧ | Apps & Scrolling · Shift | 30 |
| P9 | ⇧⌘ | Fast Scrolling · Command + Shift | 26 |
| P10 | ⌥⇧ | Fast Mouse · Option + Shift | 26 |
| P12 | ⌃⇧ | Scrolling · Control + Shift | 14 |
| P5, P6, P7, P11, P13, P14, P15 | other combinations | Custom | 5 each (keypad mouse buttons only) |
The seven "Custom" planes are free for your own bindings. Only the five keypad mouse buttons are bound there, so that a click keeps working whatever modifiers you hold.
Twenty-three bindings open an app, among them Safari, iTerm, Visual Studio Code, Alfred, Codex and Claude. If an app is not installed, its key does nothing. The full list is in Windows and apps.
⇪ A and the number keys 1 to 5 have no binding on the base plane.The eight keys under your right hand, H J K L and U I O P, carry most of the layout. On the base plane they move the cursor; other planes turn them into selection, tab and app switching, Spaces, the mouse, and scrolling. The mouse and scroll planes are on Mouse and scrolling.
| Key | ⇪ move | ⇪ ⌘ select | ⇪ ⌥ ⌘ extended selection |
|---|---|---|---|
| H | ← | ⇧← | ⌥⇧←, select a word left |
| J | ↓ | ⇧↓ | ⇧↓ three times |
| K | ↑ | ⇧↑ | ⇧↑ three times |
| L | → | ⇧→ | ⌥⇧→, select a word right |
| U | Page Up | ⇧Page Up | ⇧Page Up |
| I | Home | ⇧Home | End, then ⇧Home twice: select to the start of the line |
| O | End | ⇧End | Home, then ⇧End: select the whole line |
| P | Page Down | ⇧Page Down | ⇧Page Down |
⇪ I and ⇪ O send the Home and End keys, not ⌘← and ⌘→. Some Mac text
views scroll on Home and End instead of moving the cursor; where you want the
start or end of the line, rebind them in the editor.
Arrow keys keep working as usual. A single key such as ← repeats while you hold the chord, exactly like the real arrow key.
| Key | ⇪ ⇧ | ⇪ ⌃ |
|---|---|---|
| H | Previous tab (⌃⇧Tab) | Space to the left (⌃←) |
| J | Next app (⌘Tab) | Windows of the current app (⌃↓) |
| K | Previous app (⇧⌘Tab) | Mission Control (⌃↑) |
| L | Next tab (⌃Tab) | Space to the right (⌃→) |
| U | Zoom out (⌥⌘−) | Full screen (⌃⌘F) |
| I | Previous window of the app (⇧⌘`) | Hide the app (⌘H) |
| O | Next window of the app (⌘`) | Mission Control (⌃↑) |
| P | Zoom in (⌥⌘=) | Open Apps (Launchpad) |
Spaces, App Exposé, and screen zoom follow the shortcuts set in macOS System Settings. If you changed or turned off one of those shortcuts, the chord sends the same keys but macOS does nothing with them.
More switching keys sit on the left hand: see Windows and apps.
Capslock can drive the pointer from three places: the letter keys under your right hand, the arrow keys, and the numeric keypad. Movement and scrolling run smoothly for as long as you hold the chord. Mouse buttons are held while you hold the chord, so holding a click chord and moving drags.
| Key | ⇪ ⌥ mouse | ⇪ ⌥ ⇧ fast mouse | ⇪ ⌃ ⇧ scroll | ⇪ ⇧ ⌘ fast scroll |
|---|---|---|---|---|
| H | Move left | Move left, fast | Scroll left | Scroll left, fast |
| J | Move down | Move down, fast | Scroll down | Scroll down, fast |
| K | Move up | Move up, fast | Scroll up | Scroll up, fast |
| L | Move right | Move right, fast | Scroll right | Scroll right, fast |
| U | Left click | Left click | Scroll right | Scroll right, fast |
| I | Right click | Right click | Scroll up | Scroll up, fast |
| O | Back button (4) | Back button (4) | Scroll down | Scroll down, fast |
| P | Forward button (5) | Forward button (5) | Scroll left | Scroll left, fast |
On the two scroll planes, U I O P scroll in the opposite direction to H J K L. Fast movement is twice the normal speed; fast scrolling is twice the normal scroll.
| Hold with an arrow | Effect |
|---|---|
⇪ | Move the pointer |
⇪ ⌘ | Move the pointer fast |
⇪ ⌥ | Move the pointer slowly |
⇪ ⇧ | Scroll in the arrow's direction |
⇪ ⌥ ⇧ | Scroll slowly |
⇪ ⇧ ⌘ | Scroll fast, in the opposite direction |
The reversed direction on ⇪ ⇧ ⌘ is carried over unchanged from the
Karabiner-Elements layout. Rebind the four arrows on that plane if you prefer
it to match.
| Chord | Click |
|---|---|
⇪ Return | Left click |
⇪ ⌘ Return | Right click |
⇪ ⌥ Return | Middle click |
⇪ ⇧ Return | Back button (4) |
⇪ ⌃ Return | Forward button (5) |
⇪ ⌃ ⇧ Return | Left click |
With a numeric keypad, keys 1 to 9 move in eight directions, laid out like the keypad itself: 7 up-left, 8 up, 9 up-right, 4 left, 6 right, 1 down-left, 2 down, 3 down-right. Key 5 does nothing.
| Hold with keypad 1–9 | Effect |
|---|---|
⇪ | Move the pointer |
⇪ ⌘ | Move fast |
⇪ ⌥ | Move slowly |
⇪ ⇧ | Scroll |
⇪ ⌥ ⇧ | Scroll slowly |
⇪ ⇧ ⌘ | Scroll fast |
The keypad buttons work on all sixteen planes. Any modifier you hold is applied
to the click, so ⇪ ⌘ 0 on the keypad is a ⌘-click.
| Keypad key | Button |
|---|---|
| 0 | Left click |
| Enter | Right click |
| . | Middle click |
| − | Back button (4) |
| + | Forward button (5) |
On the base plane the remaining keypad keys scroll slowly: / and =
vertically, * and Clear horizontally.
N M , . sit below the navigation keys and delete in both directions.
| Key | ⇪ | ⇪ ⌘ | ⇪ ⌥ |
|---|---|---|---|
| N | Delete the previous word (⌥⌫) | Delete to the start of the line (⇧⌘←, then ⌫) | Delete to the start of the line (⌘⌫) |
| M | Delete the previous character (⌫) | Delete the previous word (⌥⌫) | Move the line down (⌥⇧↓) |
| , | Delete the next character (⌦) | Delete the next word (⌥⌦) | Move the line up (⌥⇧↑) |
| . | Delete the next word (⌥⌦) | Delete to the end of the line (⇧⌘→, then ⌫) | Delete to the start of the line (⌘⌫) |
⌥⇧↑ and ⌥⇧↓ move a line in editors that use those shortcuts, such as Visual Studio Code. Elsewhere they extend a selection.
Symbols that need Shift move onto unshifted chords. These bindings type the characters of a US keyboard layout.
| Key | ⇪ | ⇪ ⌘ | ⇪ ⌥ |
|---|---|---|---|
| - | _ | Zoom out (⌘−) | |
| = | + | Zoom in (⌘=) | |
| [ | ( | { | < |
| ] | ) | } | > |
| ; | : | ! | |
| ' | = | = | |
| \ | Toggle comment (⌘/) | ||
| / | Toggle comment (⌘/) |
⇪ ; then ⇪ ' types :=; ⇪ ⌘ ; then ⇪ ' types !=.
The top-row digits 6 to 0 are five clipboard slots.
| Chord | Effect |
|---|---|
⇪ ⌘ 6 … ⇪ ⌘ 0 | Copy the selection (⌘C) and save it in slot 6 … 0 |
⇪ 6 … ⇪ 0 | Put slot 6 … 0 on the clipboard and paste it (⌘V) |
A slot keeps everything that was copied, not only text, so images and rich text survive. Pasting from a slot replaces what was on the system clipboard. Slots are encrypted on disk with a key kept in your Keychain, and their contents are never written to the log.
| Key | ⇪ | ⇪ ⌘ |
|---|---|---|
| D | ⌃D, end of input | Look up the selected word (⌃⌘D) |
| Z | ⌃Z, suspend | F5 |
| X | ⌃R, search command history | ⌃F5 |
| V | ⌃V | |
| B | ⌃B | |
| C | Open Codex | Open Claude |
⇪ X sends ⌃R, not ⌃X, and ⇪ C opens an app rather than sending ⌃C.
F5 and ⌃F5 start debugging and run without debugging in Visual Studio Code.
Tab, Q, W, A and S sit under the left hand, so you can switch and close while the right hand stays on the mouse or the navigation keys.
| Key | ⇪ | ⇪ ⌘ | ⇪ ⌥ | ⇪ ⌃ | ⇪ ⇧ |
|---|---|---|---|---|---|
| Tab | Next app (⌘Tab) | Previous app (⇧⌘Tab) | Space to the right (⌃→) | Next tab (⌃Tab) | |
| Q | Quit the app (⌘Q) | Quit the app (⌘Q) | Lock the screen (⌃⌘Q) | Log out (⇧⌘Q) | |
| W | Close the window or tab (⌘W) | Close (⌘W) | Sleep the display | Sleep the Mac | |
| A | Mission Control (⌃↑) | Show the desktop (F11) | Open Apps (Launchpad) | ||
| S | Next tab (⌃Tab) | Previous tab (⌃⇧Tab) | Next window of the app (⌘`) | Previous window of the app (⇧⌘`) |
⇪ A on its own has no binding. Sleep the display and Sleep the Mac are
built-in actions that run immediately; in the Playground's Safe Practice mode
they are only previewed.
E, R, T, Y, F and G open apps, three per key. An app that is not installed is skipped: the key does nothing until you install it.
| Key | ⇪ | ⇪ ⌘ | ⇪ ⌥ |
|---|---|---|---|
| E | Safari | Finder | |
| R | iTerm | Preview | Terminal |
| T | Visual Studio Code | Typora | Notes |
| Y | Siri | Karabiner-Elements | Amphetamine |
| F | Alfred | Dash | Dictionary |
| G | IntelliJ IDEA | Google Chrome | Calendar |
| C | Codex | Claude |
⇪ ⌃ P, ⇪ ⌃ A and ⇪ F4 open Apps (Launchpad on older macOS).
Apps are matched by bundle ID, not by name or path, so they open wherever they are installed. To open a different app, pick the key in the keyboard editor and choose Open app.
| Key | ⇪ | ⇪ ⌘ |
|---|---|---|
| F1 | Brightness down | ⌃1, switch to desktop 1 |
| F2 | Brightness up | ⌃2, switch to desktop 2 |
| F3 | Mission Control (⌃↑) | ⌃3, switch to desktop 3 |
| F4 | Open Apps (Launchpad) | |
| F5 | Keyboard light down | |
| F6 | Keyboard light up | |
| F7 | Previous track | |
| F8 | Play or pause | |
| F9 | Next track | |
| F10 | Mute | |
| F11 | Volume down | |
| F12 | Volume up | |
| F13 | Screenshot of the screen to the clipboard (⌃⇧⌘3) | Screenshot of the screen to a file (⇧⌘3) |
| F14 | Screenshot and recording toolbar (⇧⌘5) | ⇧⌘6 |
| F15 | Play or pause | |
| ` | Screenshot of an area to the clipboard (⌃⇧⌘4) | Screenshot of an area to a file (⇧⌘4) |
These chords need the key to arrive as a real F-key. If the top row of your keyboard controls brightness and volume by default, hold fn as well, or turn on "Use F1, F2, etc. keys as standard function keys" in System Settings. ⌃1 to ⌃3 switch desktops only when those shortcuts are enabled in System Settings.
The editing cluster above the arrow keys sends ⇧⌥ with a media key, which macOS treats as a quarter step.
| Key | ⇪ |
|---|---|
| Insert (Help) | Brightness up, quarter step |
| ⌦ Forward Delete | Brightness down, quarter step |
| Home | Keyboard light up, quarter step |
| End | Keyboard light down, quarter step |
| Page Up | Volume up, quarter step |
| Page Down | Volume down, quarter step |
Everything on these pages is done in the app. You never need to edit a file by hand, although the configuration file is plain YAML if you want to.
The Keyboard page is the editor. It draws your keyboard for the selected plane with each mapped action on its key. Keys your keyboard lacks, such as F16 or a numeric keypad on a laptop, appear under Keys not on this keyboard, and tap and double-tap mappings appear under Other triggers. Switch to List in the toolbar for a list grouped by trigger type.
Click a key. A popover shows its chord, the plane, and the current Action:
Three buttons stop a key from doing its mapped action. They differ in what the key does afterwards:
| Button | The chord then… |
|---|---|
| Disable | Does nothing. The key press is swallowed. |
| Use Normal Key | Always types the key itself, as if Caps Lock were not held. |
| Remove Mapping | Follows the profile's rule for unmapped chords, which may type the key, ignore it, or send Hyper. |
A key with no mapping shows "Not mapped on this plane", what it does now, and Assign Action.
Click + in the toolbar, or Edit… on a key, to open the mapping editor.
Trigger. Choose one of:
Change Trigger moves an existing mapping to another key, plane, or trigger; its action and app rules move with it.
Default action. The action that runs in every app, unless an app rule below matches. Pick a built-in action, one of your custom actions, New Action…, or define one inline.
App rules. Optional. Each rule names one or more apps and an action for them. See App rules.
Each key and plane can hold one mapping; the editor refuses a duplicate.
Every save is checked first, then the whole configuration is written to disk in one step, and only then does the running keyboard switch over. A change either applies completely or not at all.
Undo and Redo in the toolbar, or ⌘Z and ⇧⌘Z, reverse the last change to your mappings. One step is kept, and the history is cleared when Capslock relaunches.
If you edit the configuration file in another app, Capslock reloads it the next time you switch to Capslock. A save that would overwrite such an outside change is refused, so you can make your change again on top of it.
The More menu in the toolbar has three commands:
capslock-config.yml by default).An app rule makes a key do something different while a particular app is in front, without changing what it does everywhere else.
Each mapping has a Default action and, optionally, a list of App rules. When you press the chord, Capslock checks the rules from top to bottom against the app in front. The first rule that names that app wins. If none does, the default action runs.
Apps are identified by their exact bundle ID, such as com.apple.Safari. A
rule keeps working if the app is moved or renamed, and it never matches a
different app with a similar name.
From a key:
From the Apps page, click Add Rule…, choose an app, and the mapping editor opens with that app already filled in. To pick an app that is not installed yet, type its bundle ID instead of browsing.
Use the arrows next to a rule to change its order. Every rule must name at least one app.
The Apps page lists every app that has rules, marks the ones that are not installed, and shows each rule. From an app's menu you can add another rule for it or Remove All Rules. Removing all rules for an app is a single change: it is backed up first and can be undone.
A rule is a bindings entry on the mapping. This one keeps ⇪ N deleting
the previous word with ⌥⌫ everywhere, but sends ⌃W in Terminal and iTerm,
where shells expect it:
Rules the editor cannot display are shown as "Advanced rule (edit in YAML)" and kept unchanged. See Configuration file.
A mapping runs an action. Actions are either built in or yours. The Actions page lists both; built-ins cannot be edited, but any of them can be mapped.
| Action | ID |
|---|---|
| Left, Right, Up, Down | builtin.move_left, builtin.move_right, builtin.move_up, builtin.move_down |
| Word Forward, Word Back | builtin.word_forward, builtin.word_back |
| Home, End | builtin.line_start, builtin.line_end |
| Up 10 Lines, Down 10 Lines | builtin.jump_up_10, builtin.jump_down_10 |
| Backspace | builtin.backspace |
| Next Line | builtin.new_line |
| Insert Quotes | builtin.insert_quotes |
| Escape | builtin.escape |
| Toggle Caps Lock | builtin.toggle_caps_lock |
| Do Nothing | builtin.noop |
| Normal Key | builtin.passthrough |
The IDs are permanent: a mapping that refers to one keeps working across versions.
Click New Action… on the Actions page, or define an action inline in the mapping editor. The types are:
| Type | What it does |
|---|---|
| Key combo | Sends one key with any of ⌃ ⌥ ⇧ ⌘. |
| Jump | Moves the cursor several lines in one direction. |
| Open app | Opens or brings forward an app, chosen from Applications. |
| Shell command | Runs a command with /bin/sh. Needs your approval; see below. |
| Hold modifier | Keeps one modifier pressed for as long as you hold the trigger, like push-to-talk. Use it with a Caps + key trigger. |
| Switch Input Source | Selects one specific installed input source. Available in the mapping editor. |
The mouse, scrolling, sleep, clipboard-slot, and media actions used by the Classic layout appear under Mouse & system. You can map them to other keys, but not create new ones.
An action that a mapping uses cannot be deleted; the Actions page names the mappings to remove first.
Saving a Shell command asks Trust this action? A trusted command runs with your user privileges. It can change files and use the network, and neither Pause nor Undo can reverse what it has done. Click Trust & Save to keep it. The same question appears for the Sleep Mac and Sleep Display actions.
A command is never trusted by accident:
Commands run in the background with their output discarded; Capslock does not log what they print.
The default layout's ⇪ Space sends ⌃Space, so macOS uses whatever shortcut
you set for "Select the previous input source". To jump straight to one input
source instead, map a key to Switch Input Source and pick it.
Some Chinese, Japanese and Korean input sources do not take effect reliably when switched directly. Settings › Input sources offers two workarounds for Caps + key mappings that switch input source:
Settings › Hyper › Hyper mode has two choices. You also pick one during onboarding.
| Classic (default) | Native | |
|---|---|---|
| What other apps see while Caps Lock is held | Right ⌘, ⌥, ⌃ and ⇧ held down | Nothing |
| Hyper shortcuts in Alfred, Raycast, Moom and similar apps | Work | Do not see Hyper |
| Modifiers that choose a plane | Left side only | Either side, unless you choose Left only |
| A mapped chord's output | Clean: ⇪ H sends a plain ← | Clean |
Pick Classic if you have shortcuts in other apps that rely on Hyper (⌃⌥⇧⌘), or if you are coming from the Karabiner-Elements configuration. Pick Native if nothing else listens for Hyper and you want either side's modifiers to choose a plane.
In Classic mode Capslock itself holds the right-side modifiers, which is why only the left side can choose a plane.
Settings › Profile behavior › Unmapped Caps chords decides what a chord
with no mapping does, for example ⇪ A on the base plane:
| Choice | The chord… |
|---|---|
| Send the normal key (default) | Types the key as if Caps Lock were not held. In Classic mode other apps also see the held Hyper modifiers, so their Hyper shortcuts work. |
| Ignore it | Does nothing. |
| Send ⌘⌥⌃⇧ + key | Sends the key with all four modifiers, so another app can use it as a Hyper shortcut. |
A key mapped to Use Normal Key always types itself, whichever choice is set here. A key whose mapping you removed follows this setting. See Change one key.
Settings › Profile behavior › Modifier sides chooses which ⌘ ⌥ ⌃ ⇧ select a plane:
Both profile settings are saved inside your configuration, so they travel with an export, an import, a backup, and Undo.
Settings › Hyper › Double-tap speed is the longest gap between two taps that still counts as a double tap: 200 ms by default, from 100 to 500 ms. It applies to Double-tap Caps and Double-tap Modifier mappings.
Settings › Advanced › Key remaps turns a spare right-side ⌘, ⌥, ⌃ or ⇧ into F13, F14, F15, F16, F17 or F19, which you can then use as a shortcut in any app. The remapped key stops working as a modifier; its left-side twin is unaffected. F18 is reserved for Caps Lock.
Settings are stored in app_config.yml; see
Configuration file.
| Section | Setting | Default |
|---|---|---|
| General | Open at login | Off |
| Show window at launch | On; when off, Capslock starts quietly in the menu bar | |
| Hide Dock icon | Off | |
| Language | Follow System (English or Simplified Chinese) | |
| Appearance | System, Light or Dark | |
| Hyper | Hyper mode | Classic |
| Double-tap speed | 200 ms | |
| Hold to reveal | On, 550 ms delay, hides when an action runs | |
| Show actions on screen | Off, 1.35 s | |
| Profile behavior | Unmapped Caps chords | Send the normal key |
| Modifier sides | Automatic | |
| Input sources | Fix for CJK input sources | None |
| Advanced | Key remaps | None |
| Show counts on mappings | On |
The Status, Permissions and Recovery sections repeat the controls from Home and Diagnostics: Pause and Resume, the permission rows, Release All, Restore Caps Lock, and Show Config Folder.
Reset Settings… at the bottom puts every setting back to its default. Your mappings, actions and app rules stay as they are.
The menu-bar icon is always present: a filled ⇪ while Capslock is running, an outline while it is paused, and a warning triangle when something needs attention. Its menu contains:
Closing the main window, or pressing ⌘W, hides it; Capslock keeps running.
The Statistics page shows how often you use each trigger, for today, the last 7 days, the last 30 days, or all time, with a Most used ranking.
Reset Statistics clears every count and cannot be undone. Settings › Advanced › Show counts on mappings shows or hides the counts next to mappings.
You never have to edit these files: everything here can be changed in the app. They are plain YAML so that you can read them, keep them in version control, or move them to another Mac with Export and Import.
~/Library/Application Support/com.vonng.capslock/
Settings › Recovery › Show Config Folder opens it in Finder. Your language choice is kept in the app's preferences, and the clipboard key in your Keychain.
The file has three parts: a capslock_profile block that Capslock maintains,
your custom actions, and the mappings. Built-in actions are never written
to the file.
trigger.kindhyper_plus_key, single_tap_hyper, double_tap_hyper, or double_tap_modifiertrigger.keyhyper_plus_key: the key, as a JavaScript key code (72 is H)trigger.planehyper_plus_key: 0 to 15, the sum of Command 1, Option 2, Control 4, Shift 8trigger.modifierdouble_tap_modifier: which modifieraction_idbuiltin.move_left, or the id of a custom actionactionaction_idbindingskey_combotarget_key, and with_ctrl, with_alt, with_cmd, with_target_shiftjumpdirection, countopen_appbundle_id, app_namecommandcommand, trustedinput_sourceinput_source_idhold_modifiermodifierdirectional, independentaction (used by built-ins)nativenative_action (mouse, scroll, media, clipboard and sleep actions from the Classic layout)A command action loaded from a file you edited or imported is not trusted
until you approve it in the app, even if the file says trusted: true.
Before a change that replaces a lot at once, such as an import, reinstalling
the Classic layout, removing an app's rules, or changing profile behaviour,
Capslock saves a copy of action_mappings.yml in backups/. The newest 20
are kept.
action_mappings.yml cannot be
read, Capslock backs it up, shows the configuration as read-only, and does
not start until you repair it or import a good one. Diagnostics reports
"Configuration needs repair".The Diagnostics page runs a set of checks and explains, in numbered steps, how to fix any that fail. Most fixes are a button on the same row. Refresh runs the checks again.
| Check | Healthy | If it fails |
|---|---|---|
| Caps Lock mapping | Caps Lock is ready | Not set up, used by another tool, or unreadable. Try Again, or Restore Caps Lock. |
| F18 | F18 is free | Another tool uses F18. Remove that remap, then Try Again. |
| Karabiner-Elements | Not detected, or no conflicts | A rule uses Caps Lock or F18; see Karabiner. |
| Crash recovery | Nothing to recover | The last session did not quit cleanly and was tidied up at launch, or another copy of Capslock is running. |
| Accessibility | Granted | Open Accessibility Settings, Check Again, or Reset & Ask Again. |
| Keystroke sending | Allowed | Comes with Accessibility. Request Access, Check Again, or Reset & Ask Again. |
| Keyboard reading | Reading the keyboard | macOS stopped the event tap. Try Again, or Release All. |
| Secure input | Off | A password field or Terminal's Secure Keyboard Entry hides keys from every app. Capslock never turns it off; close the field or the option. |
| Caps Lock press | Received | Press Caps Lock once, then Refresh. |
| Configuration | Valid | The file cannot be read. Show Config Folder and repair or replace it. |
| Signature | Valid | A development build. |
| Updates | Enabled | This build does not update itself; download new versions from the website. |
Reset & Ask Again clears Capslock's Accessibility and keystroke-sending entries and asks again. Use it when System Settings shows Capslock as allowed but the check still fails, which can happen after replacing the app with a different build.
| Control | What it does |
|---|---|
| Pause | Releases everything Capslock is holding, gives Caps Lock back to macOS, and reports "Paused. Caps Lock works as usual." once the system mapping has been checked. |
| Release All | Releases every key, modifier and mouse button Capslock is holding, without pausing. Use it if a key feels stuck. |
| Restore Caps Lock | Pauses and restores the key mapping that was in place before Capslock started, then reports whether it was verified. |
| Quit Capslock | Does the same as Pause before the app exits. |
Capslock only removes what it added. Other tools' key remaps are left alone.
A small helper inside the app watches Capslock while it owns Caps Lock. If Capslock crashes or is force-quit, the helper releases any keys it was holding and puts the key mapping back. On the next launch Capslock checks again before it starts, and Diagnostics notes that the last session did not quit cleanly.
Capslock also steps back on its own when it has to. When macOS stops it from reading the keyboard, when another app changes the system key mapping, or when a Karabiner rule appears, it stops and gives Caps Lock back rather than fighting over the key. After sleep it retries a few times before it reports an error. A newly connected keyboard gets the mapping too.
If Caps Lock still behaves strangely, quit Capslock and run:
It restores the mapping from before the last session and changes nothing it cannot verify. It refuses to run while Capslock is still running. Diagnostics shows the same command for the path where your copy is installed, with a Copy button.
hidutil property --set '{"UserKeyMapping":[]}' removes every tool's key
remaps, not only Capslock's.
Export… saves Capslock-Diagnostics.zip with the check results and a
redacted copy of the recent log. It never includes what you type, your
clipboard, Shell commands or their output, or your configuration. Attach it
when you report a problem.
Capslock has no installer and leaves nothing outside your user account except the Accessibility entry.
/Applications/Capslock.app to the Trash.~/Library/Application Support/com.vonng.capslock~/Library/Preferences/com.vonng.capslock.plist~/Library/Caches/com.vonng.capslockcom.vonng.capslock.clipboard-slots in Keychain Access.A Mac restart also clears the Caps Lock mapping, which macOS does not keep across restarts.
Capslock processes keyboard and pointer events on your Mac to apply the mappings you chose. It contains no behaviour analytics or advertising SDK. It sends no mapping, key, clipboard, Shell, app-history, or usage telemetry.
Everything Capslock keeps lives in your user account, under
~/Library/Application Support/com.vonng.capslock/:
A diagnostics export leaves out produced text, clipboard contents, Shell commands and output, secrets, raw key history, and full app history.
Free Play keeps only the latest physical-key observation, and only while the Playground is visible and in front. It is cleared when you leave the page or the window loses focus, and it is never uploaded.
Capslock makes no network request unless you open a link yourself, or a release build checks its HTTPS update feed for a new version. Development builds have no update feed and never check.
Shell commands that you explicitly trust run with your user privileges. They can read files or use the network on their own, and Capslock does not sandbox them. Pause, Release All, and configuration Undo do not stop a process that has already started or reverse what it did. Commands in an imported configuration must be reviewed and trusted again before they run.
Capslock asks for the macOS Accessibility permission, which its active
keyboard event tap requires. It does not need Input Monitoring. Starting at
login is optional and uses Apple's SMAppService.
Deleting the app stops it. You can also delete
~/Library/Application Support/com.vonng.capslock, its preferences and caches,
and remove Capslock from the Accessibility list in System Settings. See
Uninstall.
Questions about privacy: rh@vonng.com
No. Capslock is a standalone app and builds the whole layout in. If you also run Karabiner-Elements for other keys, that is fine as long as no Karabiner rule uses Caps Lock or F18. See Coexisting with Karabiner-Elements.
To change key events, not just observe them, macOS requires an active event tap, and that requires Accessibility. Capslock does not ask for Input Monitoring, does not install a kernel extension or driver, and runs no privileged helper.
No. Keys are handled in memory and never stored or sent anywhere. The log leaves out typed text, clipboard contents and Shell output, and the Statistics page keeps only counts. See Privacy.
A helper inside the app gives Caps Lock back and releases any held keys. You can also quit Capslock and run the restore command. A restart clears the mapping too.
Yes. ⇪ Esc turns real Caps Lock on and off. While it is on, Capslock chords
type their ordinary keys until you press ⇪ Esc again.
The keypad mouse keys are optional. ⇪ with the arrow keys, ⇪ ⌥ with
H J K L, and ⇪ Return move the pointer and click. See
Mouse and scrolling.
Chords are matched by physical key, and the Keyboard page draws your active
layout's legends. The symbol bindings, such as ⇪ [ for (, type the
characters of a US layout.
If the top row controls brightness and volume by default, the key does not arrive as an F-key. Hold fn as well, or turn on standard function keys in System Settings › Keyboard.
macOS hides keys from every app while secure input is on, for example in a password field or with Terminal's Secure Keyboard Entry. Capslock never turns it off. Diagnostics shows when it is on.
No. Capslock is a macOS app. The layout began on Windows as an AutoHotkey script, which is kept in the archive together with the older Karabiner versions.
Before Capslock was a native app, it was a configuration for Karabiner-Elements, and it still is. Capslock Enhancement V3 is a set of Karabiner rules that turns Caps Lock into Escape on a tap and a Hyper key on a hold, with the same sixteen control planes and the same layout that the native app ships as Capslock Classic. It is free and open source under the Apache 2.0 licence, with its source at github.com/Vonng/Capslock.
| Karabiner Edition | Capslock app | |
|---|---|---|
| What you install | Karabiner-Elements, then import one rule file | The Capslock app |
| Permissions | Karabiner's driver, background services, Accessibility and Input Monitoring | Accessibility only |
| Changing a key | Edit the JSON, or use the configurator | Click the key in the editor |
| Learning the layout | These pages and the configurator | Hold-to-Reveal and the Playground |
| Price and source | Free, Apache 2.0, open source | Proprietary; see Download |
| Status | Maintained | 0.4.0 release candidate |
Use only one of them for Caps Lock at a time. The Capslock app refuses to start while a Karabiner rule uses Caps Lock; turn the rules off in Karabiner-Elements first, as described in Coexisting with Karabiner-Elements.
Tap Caps Lock: Escape. Hold it and press H J K L: the cursor moves.
Capslock Enhancement V3 current targets macOS and Karabiner-Elements. There is nothing else to install: the configuration is a set of complex-modification rules that Karabiner interprets, so nothing new runs in the background and nothing is compiled on your machine.
This guide was verified with Karabiner-Elements 16.1.0 in August 2026, whose support matrix covers macOS 13 Ventura through macOS 27 on Intel and Apple silicon. Check the official site for the current release.
Download the DMG from the official site
and run Karabiner-Elements.pkg, or install the cask:
Open Karabiner-Elements Settings and follow its prompts in System Settings. Allow the privileged and non-privileged background services, Accessibility, Input Monitoring, and the Driver Extension. Under Virtual Keyboard, select the layout matching your physical keyboard. The official installation guide explains what each permission is for.
Open the import link below. Any browser hands it straight to Karabiner-Elements:
Import Capslock Enhancement V3.1
Or paste the URL yourself:
Choose Import and allow the browser to open Karabiner-Elements.
Under Settings › Complex Modifications, enable the rules you want. The ten
rules are independent, so a family you have no use for can simply stay off;
the first one, CapsLock to Hyper, is the one every other rule depends on.
Then tap ⇪: it should send ⎋. Hold it while pressing H J K L: the cursor moves. You are on plane zero.
Two alternatives lead to the same place. The Karabiner gallery page
has an Import button of its own, and for a fully offline install you can
drop capslock.json
into ~/.config/karabiner/assets/complex_modifications/ and pick Add predefined rule. Karabiner-EventViewer shows what any key actually
emits if something looks wrong.
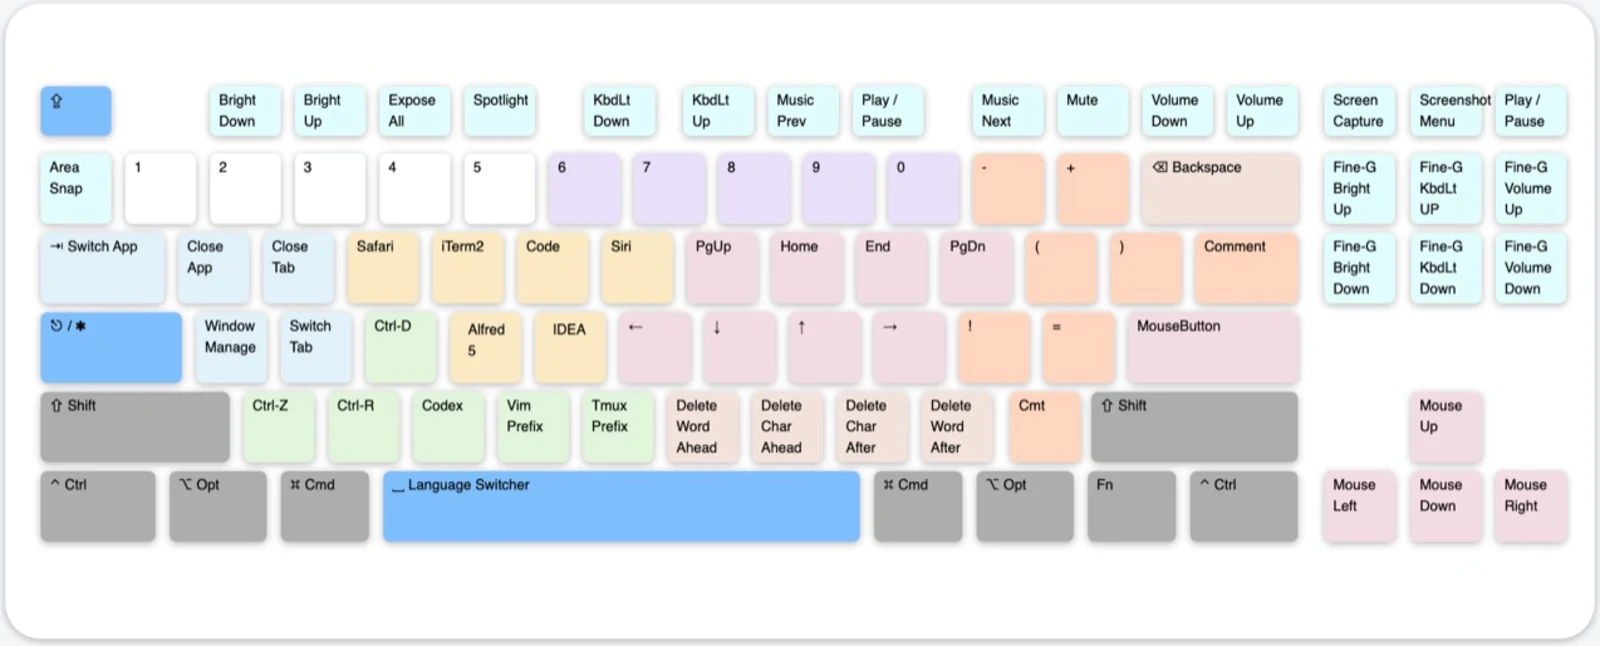
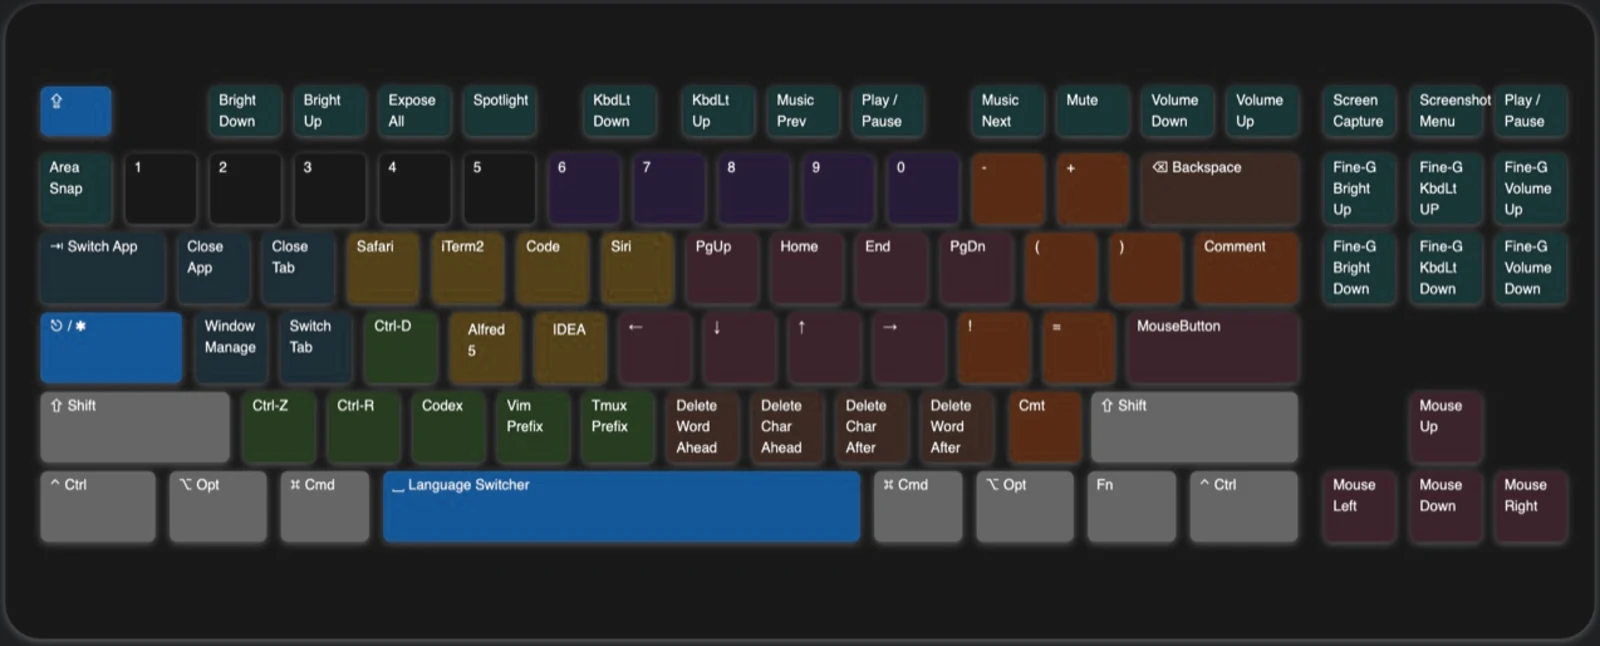
The keyboard map is colour-coded by purpose, so a key's neighbourhood tells you roughly what it does before you look anything up. The configuration ships as ten Karabiner rules, one per family, and you enable them one by one.
| Family | Colour | What it does | Mappings |
|---|---|---|---|
| Basic | Blue | Tap ⇪ for ⎋, hold it for ✱ Hyper, plus input-source switching | 4 |
| Navigation | Pink | Vim-style movement, selection, tab and window switching, pointer and wheel | 102 |
| Deletion | Brown | NM,. delete by character, word or line without moving your hand | 12 |
| MouseKey | Keypad | The numeric keypad as a complete mouse | 63 |
| Window | Azure | Close and cycle tabs, windows, apps and desktops; sleep, lock, log out | 19 |
| Application | Yellow | Launch or focus six applications across three planes | 18 |
| Terminal | Green | Terminal signals, IDE run controls, Vim and Tmux prefixes, Codex and Claude | 10 |
| Clipboard | Purple | Five extra text clipboards on 6–0 | 10 |
| Shifter | Orange | Brackets, braces and code punctuation within reach of the home row | 16 |
| Functional | Cyan | Screenshots, media, brightness, keyboard light and volume | 28 |
The configurator reads the same V3 JSON. It is the fastest way to inspect one key on any plane, or to change an application shortcut and export a configuration you can import straight away.
Caps Lock now has two behaviours that never collide, because one is decided on release and the other while the key is down.
| Gesture | Output | Purpose |
|---|---|---|
| Tap ⇪ | ⎋ Escape | Escape without leaving the home row |
| Hold ⇪ | ✱ Hyper | Enter the base control plane |
| ✱ with ⎋ | ⇪ Caps Lock | Toggle the original Caps Lock state |
| ✱ with ␣ | ⌃ with ␣ | Switch input source |
| ✱ with ⌘ with ␣ | ⌃ with ⌘ with ␣ | Emoji and symbols picker |
✱ is not a private signal. Karabiner rewrites the held Caps Lock into all four right-side modifiers at once, ⌘ with ⌥ with ⌃ with ⇧, which has two consequences worth understanding:
While Hyper stays held, the four left-side modifiers act as four binary switches. Read them as four bits and you get planes 0–15:
⌘ = 1 · ⌥ = 2 · ⌃ = 4 · ⇧ = 8.
| Plane | Left modifiers | Mappings | What lives there |
|---|---|---|---|
| 0 | ✱ | 89 | The daily layer: movement, deletion, apps, terminal, symbols |
| 1 | ✱ with ⌘ | 59 | Selection, second-choice apps, clipboard copy |
| 2 | ✱ with ⌥ | 38 | Pointer movement and third-choice apps |
| 3 | ✱ with ⌘ with ⌥ | 8 | Word and paragraph selection |
| 4 | ✱ with ⌃ | 12 | Desktop and window management |
| 5 | ✱ with ⌘ with ⌃ | — | Free |
| 6 | ✱ with ⌥ with ⌃ | — | Free |
| 7 | ✱ with ⌘ with ⌥ with ⌃ | — | Free |
| 8 | ✱ with ⇧ | 25 | App, window and tab switching |
| 9 | ✱ with ⌘ with ⇧ | 21 | Accelerated wheel |
| 10 | ✱ with ⌥ with ⇧ | 21 | Accelerated pointer |
| 11 | ✱ with ⌘ with ⌥ with ⇧ | — | Free |
| 12 | ✱ with ⌃ with ⇧ | 9 | Wheel |
| 13 | ✱ with ⌘ with ⌃ with ⇧ | — | Free |
| 14 | ✱ with ⌥ with ⌃ with ⇧ | — | Free |
| 15 | ✱ with ⌘ with ⌥ with ⌃ with ⇧ | — | Free |
Nine planes are populated; seven are free space for rules of your own. Open the configurator to browse the same sixteen rows interactively and see what each key does on the plane you select.
The planes are not arbitrary. Across the whole configuration the same modifier keeps the same meaning, which is why the layout can be learned once rather than memorized key by key:
| Modifier | Consistent meaning |
|---|---|
| ⌘ | Extend the action: select instead of move, copy instead of paste, the second application |
| ⌥ | Leave the text world: pointer, wheel, the third application |
| ⌃ | Talk to the window server: desktops, Mission Control, screen state |
| ⇧ | Switch containers: apps, windows, tabs; or accelerate a pointer action |
macOS reserves a few system-wide chords of its own. The most common clash is ⌘ with ⌥ with ⌃ with ⇧ with ., which can open a diagnostics dialog; see issue #30. Remap the system shortcut if it conflicts with a plane you use.
Continue with navigation, deletion, and mouse control.
The pink and brown areas around the home row carry the layout's most frequent operations. The navigation and deletion families together carry 114 of the 282 mappings in V3.1, so this is the part of the layout worth learning first.
Unless stated otherwise, every chord on this page assumes ✱ Hyper is held. "+ ⌘" therefore means ✱ with ⌘ plus the listed key.
H J K L move left, down, up, and right, exactly as in Vim. Directly above them, U I O P extend the same idea to whole pages and lines: Page Up, Home, End, Page Down.
Those eight keys are the only ones mapped on nine different planes. Each group of planes below covers one job, and together they account for 72 of the 282 mappings in V3.1.
The text layer follows one rule: hold ⌘ and a movement becomes a selection, because the rule emits the same arrow key with ⇧ added. Adding ⌥ on top widens the unit: a character becomes a word, a line becomes three lines, half a line becomes the whole line.
| Key | Hyper | + ⌘ | + ⌘ with ⌥ |
|---|---|---|---|
| H | Left | Select left | Select word left |
| J | Down | Select line down | Select three lines down |
| K | Up | Select line up | Select three lines up |
| L | Right | Select right | Select word right |
| U | Page Up | Select page up | Select page up |
| I | Home | Select to line start | Select the line, end to start |
| O | End | Select to line end | Select the line, start to end |
| P | Page Down | Select page down | Select page down |
That is why ✱ with ⌘ with ⌥ with I jumps to the end of the line and then selects back to its start: it is the fastest way to grab exactly one line without touching the mouse.
⇧ moves between containers, the thing you are looking at rather than the text inside it, while ⌃ talks to the window server.
| Chord | Emits | Effect |
|---|---|---|
| ✱ with ⇧ with J / ✱ with ⇧ with K | ⌘ with ⇥ / ⌘ with ⇧ with ⇥ | Next / previous application |
| ✱ with ⇧ with H / ✱ with ⇧ with L | ⌃ with ⇧ with ⇥ / ⌃ with ⇥ | Previous / next tab |
| ✱ with ⇧ with I / ✱ with ⇧ with O | ⌘ with ⇧ with ` / ⌘ with ` | Previous / next window of the same app |
| ✱ with ⇧ with U / ✱ with ⇧ with P | ⌘ with ⌥ with - / ⌘ with ⌥ with = | Zoom out / in |
| ✱ with ⌃ with H / ✱ with ⌃ with L | ⌃ with ← / ⌃ with → | Previous / next desktop |
| ✱ with ⌃ with K / ✱ with ⌃ with O | ⌃ with ↑ | Mission Control |
| ✱ with ⌃ with J | ⌃ with ↓ | Application windows of the focused app |
| ✱ with ⌃ with I | ⌘ with H | Hide the current app |
| ✱ with ⌃ with U | ⌃ with ⌘ with F | Toggle full screen |
| ✱ with ⌃ with P | ⌘ with ␣ | Spotlight |
Tab switching relies on ⌃ with ⇥, which most browsers and editors honour but a few apps do not. Window cycling uses ⌘ with `, the standard macOS "move focus to next window" shortcut; confirm it is enabled under System Settings › Keyboard › Keyboard Shortcuts….
Four more planes turn the same eight keys into a mouse, without your hands moving at all. ⇧ is the accelerator in both modes.
| Key | + ⌥ Pointer | + ⌥ with ⇧ Pointer, fast | + ⌃ with ⇧ Wheel | + ⌘ with ⇧ Wheel, fast |
|---|---|---|---|---|
| H | Pointer left | Pointer left | Wheel left | Wheel left |
| J | Pointer down | Pointer down | Wheel down | Wheel down |
| K | Pointer up | Pointer up | Wheel up | Wheel up |
| L | Pointer right | Pointer right | Wheel right | Wheel right |
| U | Left button | Left button | Wheel right | Wheel right |
| I | Right button | Right button | Wheel up | Wheel up |
| O | Back button | Back button | Wheel down | Wheel down |
| P | Forward button | Forward button | Wheel left | Wheel left |
| Plane | Pointer speed | Wheel speed |
|---|---|---|
| ⌥ / ⌃ with ⇧ | 1600 | 64 |
| ⌥ with ⇧ / ⌘ with ⇧ | 3200 | 128 |
The middle mouse button is the one exception: it lives on ✱ with ⌥ with ↩ rather than on a navigator key.
The physical arrow keys drive the pointer too, which is often quicker than reaching for the home-row layer. Here ⌥ slows down and ⌘ speeds up, in both pointer and wheel modes.
| Chord | Result | Speed |
|---|---|---|
| ✱ + arrows | Move the pointer | 1600 |
| ✱ with ⌥ + arrows | Move slowly | 800 |
| ✱ with ⌘ + arrows | Move quickly | 4200 |
| ✱ with ⇧ + arrows | Scroll the wheel | 64 |
| ✱ with ⇧ with ⌥ + arrows | Scroll slowly | 32 |
| ✱ with ⇧ with ⌘ + arrows | Scroll quickly | 256 |
In V3.1 the fast wheel reverses the vertical direction: ✱ with ⇧ with ⌘ with ↑ scrolls the same way as ✱ with ⇧ with ↓, and ✱ with ⇧ with ⌘ with ↓ the same way as ✱ with ⇧ with ↑. The horizontal arrows keep their direction.
All five mouse buttons sit on ↩:
| Chord | Button |
|---|---|
| ✱ with ↩ | Left click |
| ✱ with ⌘ with ↩ | Right click |
| ✱ with ⌥ with ↩ | Middle click |
| ✱ with ⇧ with ↩ | Back |
| ✱ with ⌃ with ↩ | Forward |
N M , . sit directly below the navigation keys. The pair on the left deletes backwards, the pair on the right deletes forwards, and the unit grows as you add modifiers.
| Key | Hyper | + ⌘ | + ⌥ |
|---|---|---|---|
| N | Delete the previous word | Delete back to the line start | Delete back to the line start |
| M | Delete the previous character | Delete the previous word | Move the line down |
| , | Delete the next character | Delete the next word | Move the line up |
| . | Delete the next word | Delete forward to the line end | Delete back to the line start |
Two rows break the pattern deliberately. ✱ with ⌥ with N and ✱ with ⌥ with . both send ⌘ with ⌫, clearing everything from the cursor back to the start of the line, so the outer keys of the block are the "throw this line away" pair. And ✱ with ⌥ with M / ✱ with ⌥ with , do not delete at all: they emit ⌥ with ⇧ with ↓ and ⌥ with ⇧ with ↑, the move-line-down/up shortcut that IntelliJ, VS Code and most editors share.
If your keyboard has a keypad, Hyper turns the whole block into a mouse. The digits give eight directions around a neutral 5; the top row scrolls; the bottom and right edges are the five buttons.
| Keypad keys | Mapping |
|---|---|
| 7 8 9 4 6 1 2 3 | Eight pointer directions, including the diagonals |
| 5 | Stop: sends a zero-velocity pointer event |
| / = | Wheel up / down |
| Num Lock * | Wheel sideways |
| 0 | Left click |
| . | Middle click |
| ⌤ | Right click |
| + / - | Forward / back |
The same speed modifiers apply as everywhere else: ⌥ slows the pointer to half, ⌘ doubles it, and adding ⇧ converts pointer motion into wheel motion at the matching speed.
Continue with windows, applications, terminal controls, clipboards, and symbols.
The layout dedicates several colour-coded zones to the actions that interrupt a developer's flow most often: switching windows, launching tools, sending terminal signals, parking text somewhere, and typing punctuation.
Every chord on this page assumes ✱ Hyper is held.
⇥ Q W A S form the azure block on the left of the keyboard. They close and cycle things, from a single tab up to the whole login session.
| Key | Hyper | + ⌘ | + ⌥ | + ⌃ | + ⇧ |
|---|---|---|---|---|---|
| ⇥ | Next app | Previous app | Next desktop | — | Next tab |
| Q | Quit app | Quit app | — | Lock screen | Log out |
| W | Close window | Close window | Display sleep | — | Sleep |
| A | Window manager | Mission Control | Show desktop | Spotlight | — |
| S | Next tab | Previous tab | Next window | Previous window | — |
Two rows deserve a note.
✱ with A is intentionally not mapped. Because Hyper is ⌃ with ⌥ with ⇧ with ⌘ on the right-hand side, an unmapped key passes straight through to whatever application is listening. Bind ⌃ with ⌥ with ⇧ with ⌘ with A inside Moom, Magnet or any other window manager and it becomes your layout key. Slate is kept only as a historical example.
Sleep is not a keystroke but a shell command: ✱ with ⇧ with W runs pmset sleepnow and ✱ with ⌥ with W runs pmset displaysleepnow.
Karabiner needs no extra permission for these, but they will not fire if a
modal dialog is blocking input.
The yellow keys launch or focus six applications on three planes. Each rule is
a plain open -a shell command, so the target is matched by application name, which is exactly what makes them safe to rewrite.
| Key | Hyper | + ⌘ | + ⌥ |
|---|---|---|---|
| E | Safari | Finder | |
| R | iTerm2 | Preview | Terminal |
| T | Visual Studio Code | Typora | Notes |
| Y | Siri | Karabiner-Elements | Amphetamine |
| F | Alfred 5 | Dash | Dictionary |
| G | IntelliJ IDEA | Google Chrome | Calendar |
The configurator rewrites any of these names in the browser and exports a JSON file you can import directly, without cloning the repository or installing anything.
Because open -a both launches and focuses, one key does the job of a Dock
icon and a ⌘ with ⇥ hunt. If an application is already frontmost,
pressing its key again does nothing: it does not toggle.
The green keys put the control chords a shell uses constantly under your right hand, so the left hand never has to contort into ⌃ + a letter mid-sentence.
| Key | Hyper | + ⌘ |
|---|---|---|
| D | ⌃ with D · send EOF | ⌃ with ⌘ with D · look up the word under the pointer |
| Z | ⌃ with Z · SIGTSTP, suspend the job | F5 · start debugging |
| X | ⌃ with R · run in the IDE | ⌃ with F5 · run without debugging |
| C | Open Codex | Open Claude |
| V | ⌃ with V · Vim block-visual / literal prefix | — |
| B | ⌃ with B · Tmux prefix | — |
✱ with C and ✱ with ⌘ with C are open -a commands like the
yellow keys, so they can be repointed at whichever assistant you use.
✱ with Z and ✱ with X deliberately do not shadow ⌘ with Z undo or ⌘ with X cut: those need no Hyper, so both spellings coexist on the same physical keys.
Number keys 6–0 become five independent text clipboards. ✱ with ⌘ plus a number copies the current selection into that slot; ✱ plus the number pastes it back.
| Chord | What happens |
|---|---|
| ✱ with ⌘ with 6 … ✱ with ⌘ with 0 | Copy the selection, then pbpaste > ~/.clip6 … ~/.clip0 |
| ✱ with 6 … ✱ with 0 | cat ~/.clip6 | pbcopy, then paste |
Two things follow from that implementation, and both are useful:
cat ~/.clip7 reads one from a shell and any editor can
fill one without touching the keyboard at all.pbpaste renders as text, not the original object.V3.1 deliberately uses five slots on 6–0. Older configurations also used 1–5, so check your habits before upgrading.
The orange keys move the punctuation a programmer types all day within reach of the home row, with no ⇧ gymnastics for brackets.
| Key | Hyper | + ⌘ | + ⌥ |
|---|---|---|---|
| - | _ | Zoom out | — |
| = | + | Zoom in | — |
| [ | ( | { | < |
| ] | ) | } | > |
| ; | : | ! | — |
| ' | = | = | — |
| / | Toggle comment | — | — |
| \ | Toggle comment | — | — |
The bracket keys are the payoff: [ and ] give all
three pairs (round, curly and angle) from the same two positions. And because
; and ' sit side by side, : = and ! = are
adjacent rolls, which is how Go and Rust assignment and comparison end up
faster to type than on a bare keyboard.
Both ✱ with / and ✱ with \ emit ⌘ with /, the comment shortcut nearly every editor and IDE shares.
Use system functions and reference for function keys, screenshots, symbols, customization, and troubleshooting.
This page collects the mappings and project details you look up rather than learn in sequence.
F1–F12 behave as standard function keys by default; hold Hyper to send their media or system functions instead. The cyan block covers the whole top row plus the screenshot keys.
| Key | Hyper action | + ⌘ |
|---|---|---|
| ` | Area screenshot to clipboard | Area screenshot to file |
| F1 / F2 | Brightness down / up | Desktop 1 / 2 |
| F3 | Mission Control | Desktop 3 |
| F4 | Spotlight | — |
| F5 / F6 | Keyboard light down / up | — |
| F7 / F8 / F9 | Previous / play-pause / next | — |
| F10 / F11 / F12 | Mute / volume down / volume up | — |
| F13 | Full screenshot to clipboard | Full screenshot to file |
| F14 | Screenshot menu | Legacy Touch Bar screenshot |
| F15 | Play / pause | — |
The screenshot keys follow one convention: the plain Hyper chord puts the capture on the clipboard, and adding ⌘ writes it to a file on the desktop.
| Chord | Emits | Result |
|---|---|---|
| ✱ with ` | ⌃ with ⇧ with ⌘ with 4 | Select an area → clipboard |
| ✱ with ⌘ with ` | ⇧ with ⌘ with 4 | Select an area → file |
| ✱ with F13 | ⌃ with ⇧ with ⌘ with 3 | Whole screen → clipboard |
| ✱ with ⌘ with F13 | ⇧ with ⌘ with 3 | Whole screen → file |
| ✱ with F14 | ⇧ with ⌘ with 5 | Screenshot and recording menu |
Enable the Desktop 1/2/3 shortcuts under System Settings › Keyboard › Keyboard Shortcuts… › Mission Control before using ⌘ with F1–⌘ with F3; macOS ships them disabled. Touch Bar behaviour applies only to legacy Touch Bar Macs; see the official troubleshooting note.
The six-key navigation cluster on a full-size keyboard gives the same three system controls in smaller steps, by emitting ⇧ with ⌥ together with the media key, macOS's own quarter-step modifier.
| Cluster keys | Action |
|---|---|
| Insert / ⌦ | Fine brightness up / down |
| ↖ / ↘ | Fine keyboard-light up / down |
| Page Up / Page Down | Fine volume up / down |
| Glyph | Name | Glyph | Name |
|---|---|---|---|
| ⇪ | Caps Lock | ✱ | Hyper |
| ⎋ | Escape | ␣ | Space |
| ⌘ | Command | ⌥ | Option |
| ⌃ | Control | ⇧ | Shift |
| ↩ | Return | ⌤ | Keypad Enter |
| ⇥ ⇤ | Tab / Back-tab | ⇭ | Num Lock |
| ← ↓ ↑ → | Arrow keys | ↖ ↘ | Home / End |
| ⇞ ⇟ | Page Up / Page Down | ⌫ ⌦ | Delete / Forward Delete |
| ⏫ ⏬ | Faster / slower | 🖲️ | Mouse wheel |
| 🖱️L / 🖱️R / 🖱️M | Buttons 1 / 2 / 3 | 🖱️B / 🖱️F | Buttons 4 / 5, back and forward |
The ✱ symbol is a heavy asterisk. The ordinary asterisk has ASCII code 42, the answer to life, the universe, and everything.
Every mapping in the configuration has the same shape. Reading one makes the whole file legible, and makes the customization section below far less intimidating:
The four right_* modifiers in mandatory are Hyper itself; they appear in
every rule that Hyper drives. Whatever else sits beside them, left_control
here, selects the control plane. to is what the application actually
receives.
V2 used only a handful of planes. V3 introduced the four-bit plane model, which is what let the layout grow to 282 mappings without becoming arbitrary. The earlier configurations are listed under Versions.
V3.1 then intentionally changed several defaults that older users will notice:
Browse all sixteen planes, inspect the real Karabiner output of any key, rename the applications behind the yellow keys, and export a ready-to-import JSON file.
Fork the repository, edit the human-readable mac_v3/capslock.yml, and
regenerate the JSON. Any rule the Karabiner schema allows is available here.
The YAML is the source of truth and the JSON is generated from it. Regenerating takes one command and yq v4:
A good first customization is claiming one of the seven free planes. Copy any
rule, change the left modifier in mandatory, and you have a whole keyboard's
worth of space that nothing else uses: plane 5
(✱ with ⌘ with ⌃) and plane 7
(✱ with ⌘ with ⌥ with ⌃) are both completely empty.
Keep the YAML and the generated JSON synchronized: the import link and the Karabiner gallery both publish the JSON.
A chord does nothing at all.
Check Settings › Complex Modifications first: the ten rules are enabled individually, and a fresh import leaves nothing on. If the rule is enabled, open Karabiner-EventViewer and press the chord. It shows exactly what reaches the system, which distinguishes a missing rule from an application that swallows the shortcut.
Caps Lock sends Escape but nothing else works.
That is the signature of enabling only the first rule. CapsLock to Hyper
provides tap-Escape and hold-Hyper; the other nine rules provide everything
that Hyper then does.
Why can a chord trigger macOS diagnostics?
Issue #30 documents that ⌘ with ⌥ with ⌃ with ⇧ with . can trigger macOS diagnostics. Remap that system shortcut if it conflicts with your chosen plane.
Why is Linux not supported?
Desktop environments differ substantially. The author primarily uses Linux
through a macOS terminal. Native support could be implemented with tools such
as xmodmap; contributions are welcome.
Why does the repository contain older macOS versions?
Legacy Karabiner used XML. Karabiner-Elements replaced it for macOS Sierra and later, so the older configurations remain for historical systems. They are listed under Versions.
Is the design original?
The first AutoHotkey version dates to 2013 and the first Mac version to 2015. The current configuration is listed in the Karabiner-Elements complex-modifications gallery.
Capslock Enhancement is maintained by Vonng and distributed under the Apache License 2.0. Source, releases, and issue tracking live on GitHub.
Pick a control plane from the table or by clicking the left-side modifiers, then click any key to see the Karabiner rule behind it. Keys that launch an application can be renamed. Your edits stay in this page until you copy or download the JSON; nothing is sent anywhere.
The interactive configurator runs only on the web page: it shows all sixteen control planes, lets you rename the application shortcuts, and exports a JSON file for Karabiner-Elements. Current configuration (3.1.0): capslock.json
capslock-3.1.0-custom.json.~/.config/karabiner/assets/complex_modifications/.The import link on Install always fetches the unmodified configuration, so use it to go back to the defaults.
Before V3, the Capslock layout went through three editions: an AutoHotkey script for Windows, an XML configuration for the original Karabiner on OS X, and a first set of rules for Karabiner-Elements. Their files are still in the GitHub repository. These pages record what each edition did and how it was installed.
These versions are not maintained. They were written for operating systems that are many years old, and nobody has checked them against current macOS or Windows. To use the layout today, install Mac V3.
| Version | Years | Ran on | Configuration |
|---|---|---|---|
| Mac V2 | 2017 – 2021 | Karabiner-Elements on macOS 10.11 – 10.13 | Complex-modification rules in JSON |
| Mac V1 | 2015 – 2017 | Karabiner and Seil on OS X 10.10 – 10.11 | A Karabiner private.xml |
| Windows | 2013 – 2015 | AutoHotkey on Windows XP – 10 | An AutoHotkey script and a prebuilt .exe |
The Mac editions wrote Hyper as ✱, and these pages keep that notation:
✱ H means hold Caps Lock and press H.
Mac V2 was written for Karabiner-Elements on macOS 10.11 El Capitan, 10.12 Sierra and 10.13 High Sierra, the systems its README listed. It was replaced by Mac V3 in 2021 and has not been checked against current macOS or Karabiner-Elements.
Mac V2 was the first Capslock edition for Karabiner-Elements, the rewrite of
Karabiner that macOS Sierra required. It is a set of ten complex-modification
rules. A tap on Caps Lock sends Escape. Holding it turns it into Hyper
(✱): Karabiner-Elements holds the four right-hand modifiers, ⌃ ⌥ ⇧ ⌘,
together, so Hyper still combines with the left-hand ones and most apps accept
it.
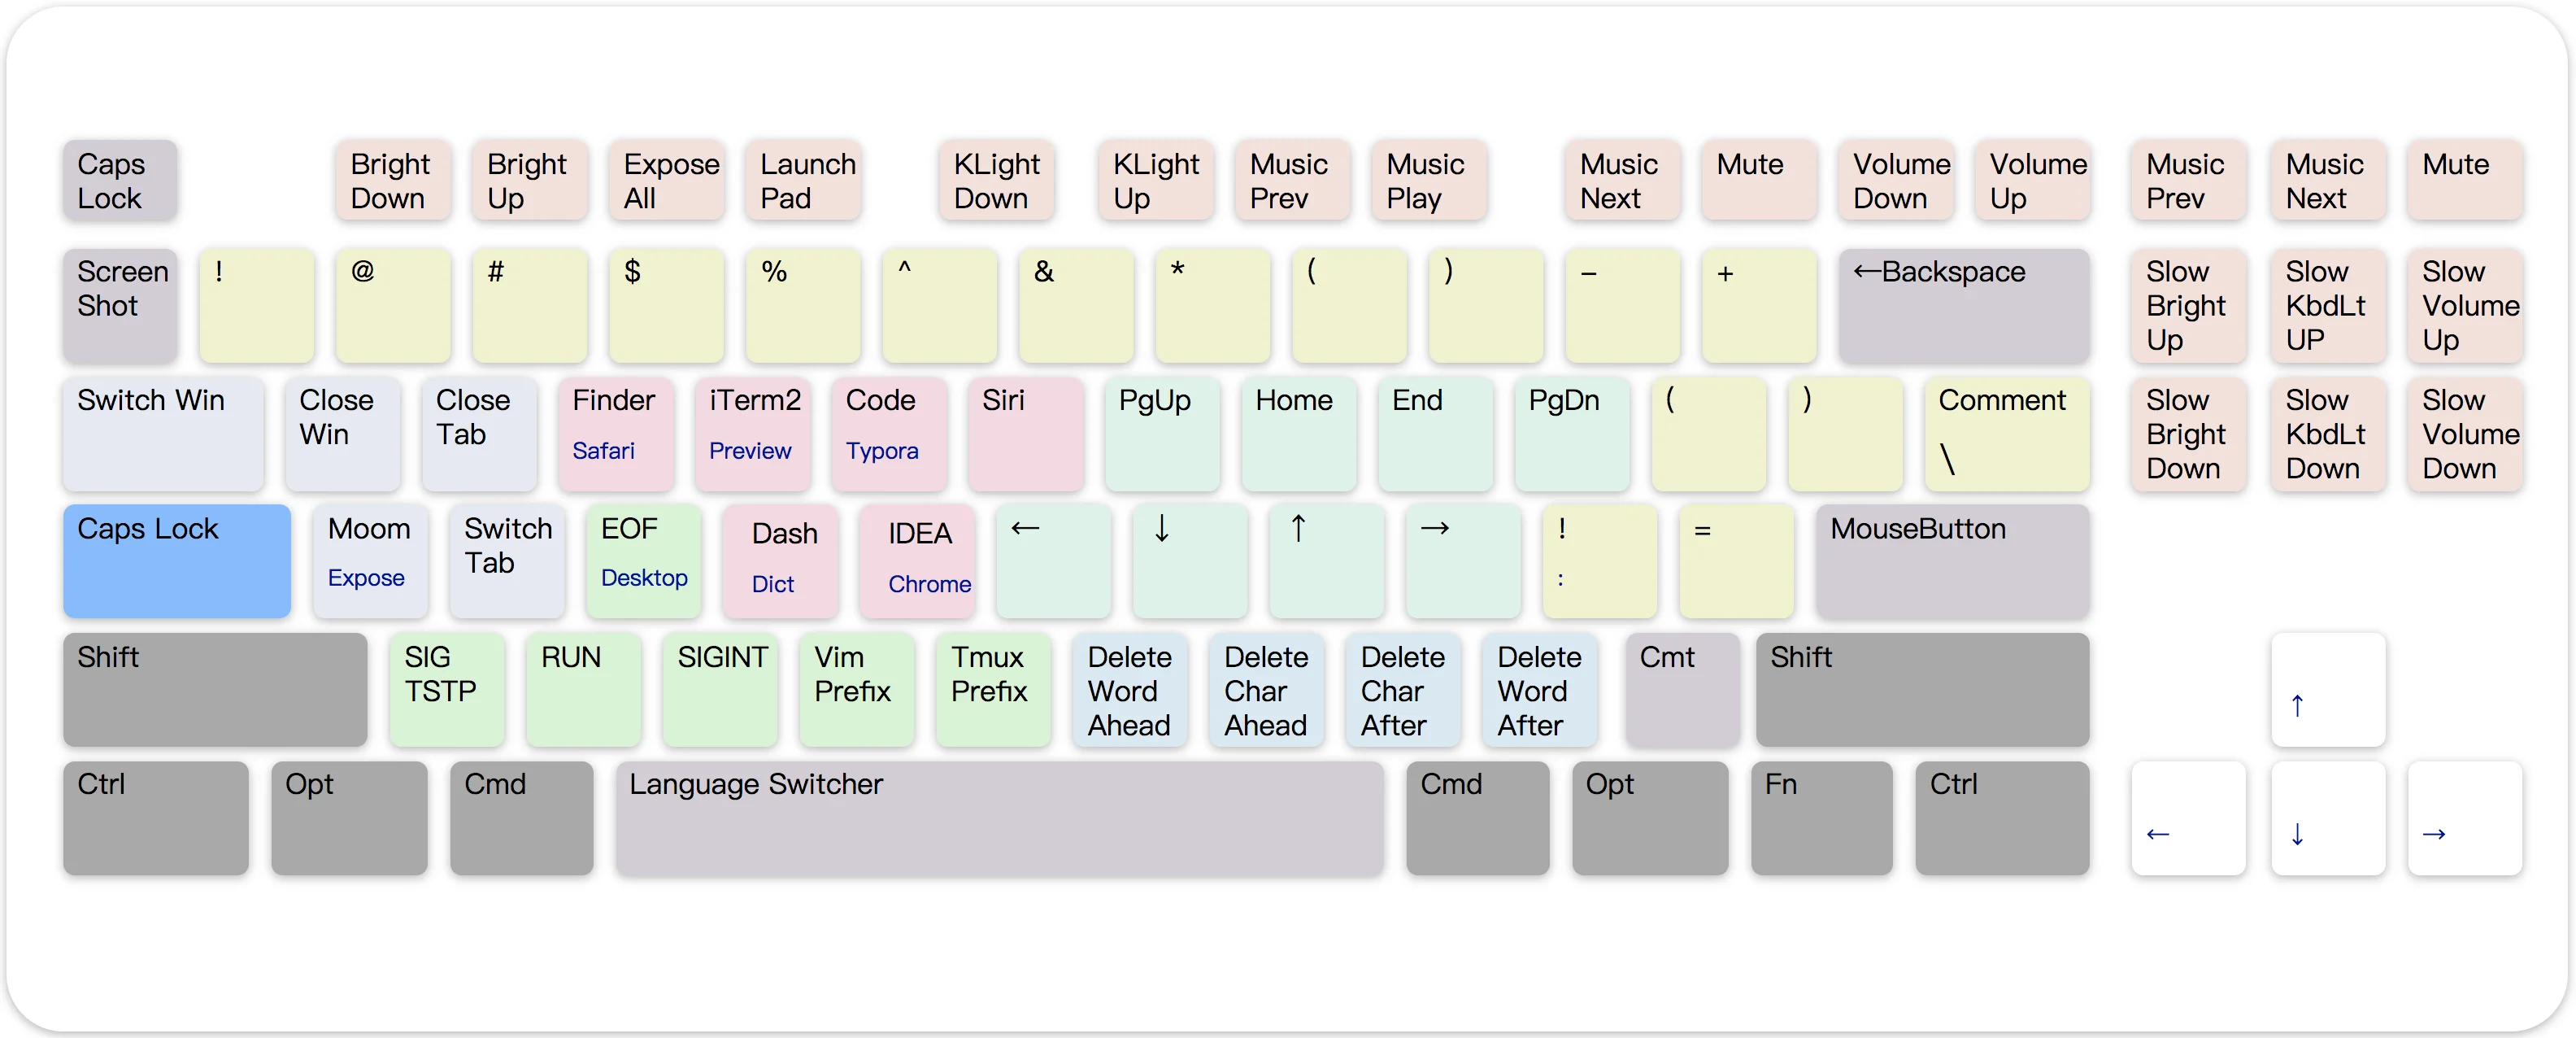
| Key | Result |
|---|---|
| Tap Caps Lock | Escape |
| Hold Caps Lock | Hyper (✱), the right-hand ⌃ ⌥ ⇧ ⌘ held together |
✱ Escape | Caps Lock. The README notes a bug: Caps Lock was hard to turn off again |
Hyper alone moves the cursor. Adding one left-hand modifier selects instead, moves the pointer, switches tabs and apps, or works with Spaces.
| Key | ✱ move | ✱ ⌘ select | ✱ ⌥ pointer | ✱ ⇧ switch | ✱ ⌃ Spaces |
|---|---|---|---|---|---|
| H | ← | ⇧← | Pointer left | Previous tab (⌃⇧Tab) | Space to the left (⌃←) |
| J | ↓ | ⇧↓ | Pointer down | Next app (⌘Tab) | Windows of the current app (⌃↓) |
| K | ↑ | ⇧↑ | Pointer up | Previous app (⇧⌘Tab) | Mission Control (⌃↑) |
| L | → | ⇧→ | Pointer right | Next tab (⌃Tab) | Space to the right (⌃→) |
| U | Page Up | ⇧Page Up | — | — | — |
| I | Home | ⇧Home | — | — | — |
| O | End | ⇧End | — | — | — |
| P | Page Down | ⇧Page Down | — | — | — |
| Key | Result |
|---|---|
✱ ← ↓ ↑ → | Move the pointer, like ✱ ⌥ H J K L |
✱ Return | Left click |
✱ ⌘ Return | Right click |
| Key | Sends | Deletes |
|---|---|---|
✱ N | ⌥⌫ | The word before the cursor |
✱ M | ⌫ | The character before the cursor |
✱ , | ⌦ | The character after the cursor |
✱ . | ⌥⌦ | The word after the cursor |
✱ ⌘ N, ✱ ⌘ M | ⌘⌫ | Back to the start of the line |
| Key | Sends | Result |
|---|---|---|
✱ Tab | ⌘Tab | Next app |
✱ ⌘ Tab | ⇧⌘Tab | Previous app |
✱ Q | ⌘Q | Quit the app |
✱ W | ⌘W | Close the tab |
✱ S | ⌃Tab | Next tab |
✱ ⌘ S | ⌃⇧Tab | Previous tab |
✱ A | ⌃⌥⇧⌘A | Left free for the window manager Moom |
✱ ⌘ A | ⌃↑ | Mission Control |
| Key | Sends | Used for |
|---|---|---|
✱ Z | ⌃Z | Suspend the job (SIGTSTP) |
✱ X | ⌃R | Run, in IDEs |
✱ C | ⌃C | Interrupt (SIGINT) |
✱ V | ⌃V | Vim prefix |
✱ B | ⌃B | The default tmux prefix |
✱ D | ⌃D | End of input (EOF) |
The README suggested replacing these with your own favourite apps.
| Key | ✱ | ✱ ⌘ |
|---|---|---|
| E | Safari | Finder |
| R | iTerm2 | Preview |
| T | Visual Studio Code | Typora |
| D | ⌃D (see above) | Dictionary |
| F | ⌃⌥⇧⌘F, left free for Alfred | Dash |
| G | IntelliJ IDEA | Google Chrome |
V2 expected F1 to F12 to act as standard function keys and used Hyper to get the printed functions back. On a MacBook Pro with a Touch Bar, the README suggested turning on Karabiner-Elements › Function Keys › "Use all F1, F2, etc. keys as standard function keys".
| Key | ✱ | Key | ✱ |
|---|---|---|---|
| F1 | Brightness down | F7 | Previous track |
| F2 | Brightness up | F8 | Play or pause |
| F3 | Mission Control | F9 | Next track |
| F4 | Launchpad | F10 | Mute |
| F5 | Keyboard backlight down | F11 | Volume down |
| F6 | Keyboard backlight up | F12 | Volume up |
Keys found on full-size keyboards:
| Key | ✱ |
|---|---|
| F13 (Print Screen) | Previous track |
| F14 (Scroll Lock) | Next track |
| F15 (Pause) | Mute |
| Insert, Delete | Brightness up, down, in fine steps |
| Home, End | Keyboard backlight up, down, in fine steps |
| Page Up, Page Down | Volume up, down, in fine steps |
| Key | ✱ types |
|---|---|
| 1 2 3 4 5 6 7 8 9 0 | ! @ # $ % ^ & * ( ) |
| - = | _ + |
| [ ] | ( ) |
| ; | ! |
| ' | = |
✱ ⌘ ; | : |
✱ ⌘ ' | = |
The last four rows make != and := quick to type.
| Key | Sends | Result |
|---|---|---|
✱ ` | ⌃⇧⌘4 | Screenshot of an area, to the clipboard |
✱ ⌘ ` | ⇧⌘4 | Screenshot of an area, to a file |
✱ Delete | ⌘⌫ | Move to Trash in Finder |
✱ / and ✱ \ | ⌘/ | Comment or uncomment, in many editors |
✱ Space | ⌃Space | Switch input source |
These are the steps from the V2 README, kept for the record.
capslock.json into
~/.config/karabiner/assets/complex_modifications/, which is what
make install in the mac_v2 folder does.~/.config/karabiner/assets/complex_modifications/.The README's own import link pointed at the repository's mac/ folder, which
now holds V3, and its second link pointed at the Karabiner-Elements gallery,
which also lists V3 today. The address above points at the V2 file.
All of V2 is in mac_v2/
in the repository.
| File | What it is |
|---|---|
capslock.json | The ten V2 rules, ready to import |
karabiner.json | A complete Karabiner-Elements configuration with the same rules. make all copies it over ~/.config/karabiner/karabiner.json and replaces your existing settings |
makefile | The install and all targets described above |
README.md | The original V2 documentation |
✱ ⌘ D runs Define instead of opening
Dictionary, and Spotlight replaces Launchpad.Mac V1 was the first Capslock edition for the Mac. It needed two tools. Seil
changed the key code that Caps Lock sends to 80, the code of F19. Karabiner then
read V1's private.xml, which turned that key into Hyper (✱) while held
and defined each group of shortcuts as a separate item to switch on in
Karabiner's preferences.
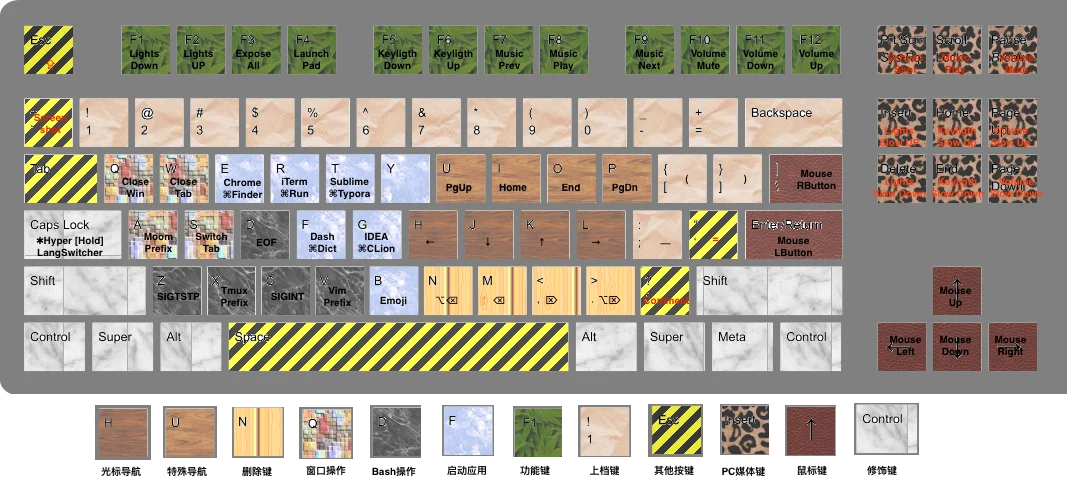
| Key | Result |
|---|---|
| Hold Caps Lock | Hyper (✱) |
| Tap Caps Lock | Escape, or ⌃Space to switch input source. These are two separate items that conflict, so turn on only one |
✱ Escape | Caps Lock |
✱ Space | Escape |
Hold Hyper to move the cursor; add the left ⌘ to select as you move.
| Key | ✱ move | ✱ ⌘ select |
|---|---|---|
| H | ← | ⇧← |
| J | ↓ | ⇧↓ |
| K | ↑ | ⇧↑ |
| L | → | ⇧→ |
| U | Page Up | ⇧Page Up |
| I | Home | ⇧Home |
| O | End | ⇧End |
| P | Page Down | ⇧Page Down |
| Key | Sends | Deletes |
|---|---|---|
✱ N | ⌥⌫ | The word before the cursor |
✱ M | ⌫ | The character before the cursor |
✱ , | ⌦ | The character after the cursor |
✱ . | ⌥⌦ | The word after the cursor |
| Key | Sends | Result |
|---|---|---|
✱ A | ⌃⌥⇧⌘A | Left free for the window manager Moom |
✱ ⌘ A | F11 | Show the desktop |
✱ Q | ⌘Q | Quit the app |
✱ Tab | ⌘Tab | Next app |
✱ ⌘ Tab | ⇧⌘Tab | Previous app |
✱ S | ⌃Tab | Next tab |
✱ ⌘ S | ⌃⇧Tab | Previous tab |
✱ W | ⌘W | Close the tab |
| Key | Sends | Used for |
|---|---|---|
✱ Z | ⌃Z | Suspend the job (SIGTSTP) |
✱ X | ⌃B | The default tmux prefix |
✱ C | ⌃C | Interrupt (SIGINT) |
✱ D | ⌃D | End of input (EOF) |
The README suggested replacing these with your own favourite apps.
| Key | ✱ | ✱ ⌘ |
|---|---|---|
| E | Google Chrome, or Safari through a separate item | Finder |
| R | iTerm | ⌃R, Run in IDEs |
| T | Typora | MWeb |
| F | Dash | Dictionary |
| G | IntelliJ IDEA | — |
| V | Visual Studio Code | — |
| Key | ✱ | Key | ✱ |
|---|---|---|---|
| F1 | Brightness down | F7 | Previous track |
| F2 | Brightness up | F8 | Play or pause |
| F3 | Mission Control | F9 | Next track |
| F4 | Launchpad | F10 | Mute |
| F5 | Keyboard backlight down | F11 | Volume down |
| F6 | Keyboard backlight up | F12 | Volume up |
Keys found on full-size keyboards:
| Key | ✱ |
|---|---|
| Insert, Delete | Brightness up, down, in fine steps |
| Home, End | Keyboard backlight in fine steps |
| Page Up, Page Down | Volume up, down, in fine steps |
| Scroll Lock | Mute |
| Pause | Play |
| Key | ✱ types |
|---|---|
| 1 2 3 4 5 6 7 8 9 0 | ! @ # $ % ^ & * ( ) |
| - = | _ + |
| [ ] | ( ) |
| ; | _ |
| ' | = |
| Key | Result |
|---|---|
✱ ← ↓ ↑ → | Move the pointer |
✱ Return | Left click |
✱ \ | Right click |
| Key | Sends | Result |
|---|---|---|
✱ / | ⌘/ | Comment or uncomment, in many editors |
✱ ` | ⌃⇧⌘4 | Screenshot of an area, to the clipboard |
✱ ⌘ ` | ⇧⌘4 | Screenshot of an area, to a file |
These are the steps from the V1 README, kept for the record.
80.private.xml. The setup script
in the mac_v1 folder copies it to
~/Library/Application Support/Karabiner/private.xml for you.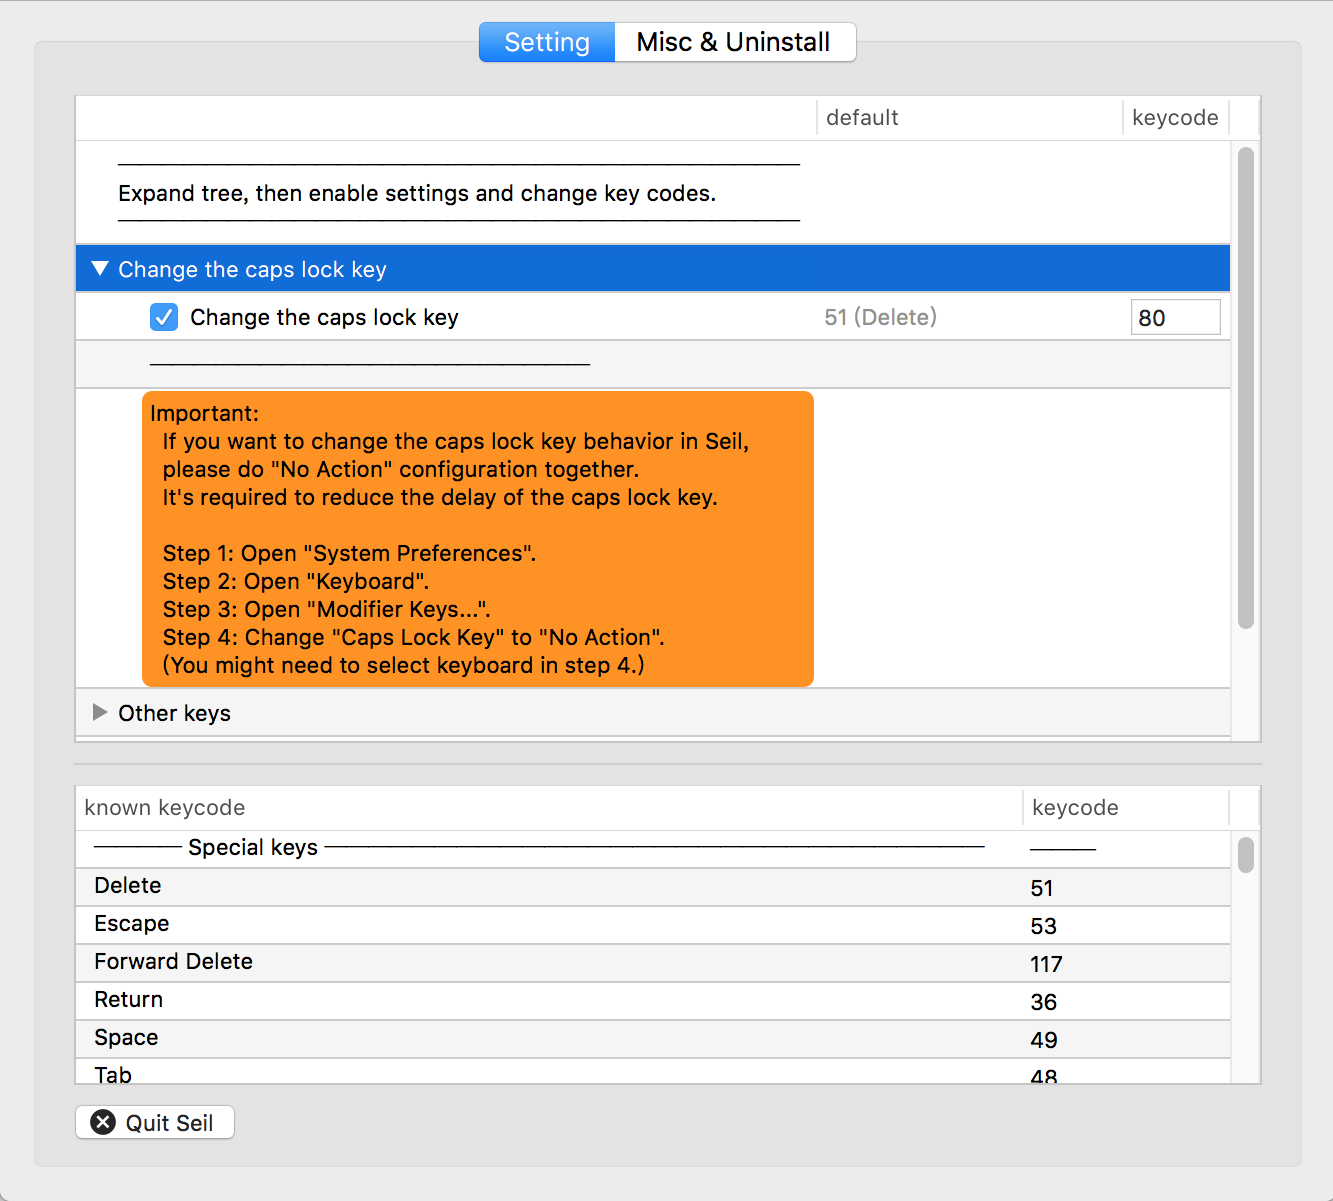
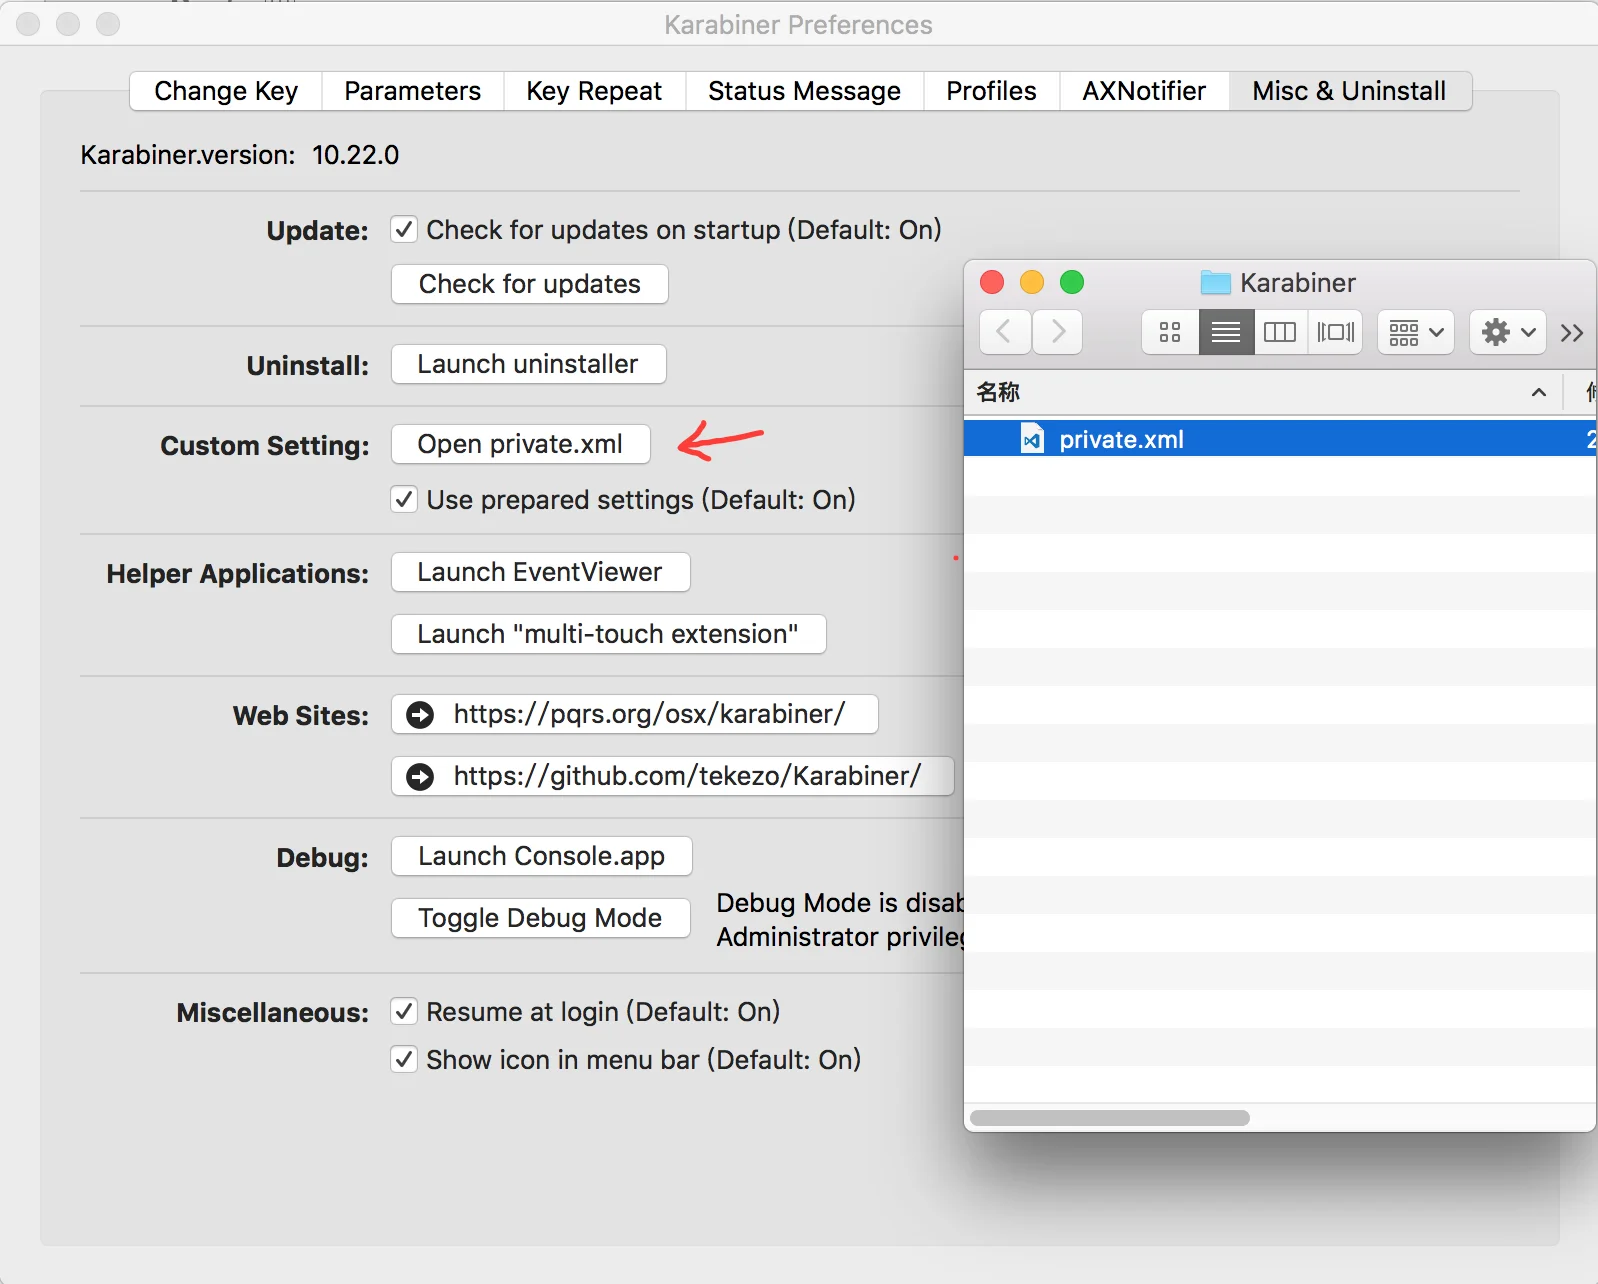
All of V1 is in mac_v1/
in the repository.
| File | What it is |
|---|---|
private.xml | The V1 configuration for the original Karabiner |
setup | A shell script that copies private.xml into Karabiner's folder |
README.md | The original V1 documentation |
The Windows version is an AutoHotkey script from 2013–2015. The Mac V2 README listed Windows XP, Vista, 7, 8 and 10 as its systems. Neither the script nor the prebuilt executable is tested on current Windows.
Capslock began on Windows in 2013, two years before the first Mac version. The script turns Caps Lock, which it calls the "useless key", into a function key like Ctrl and Alt by combining it with almost every other key on the keyboard. Caps Lock itself is kept off, and its old job moves to Caps Lock + `.
Some of its bindings differ from the Mac versions. The Mac V2 README notes this, and that the Windows version is no longer maintained.
The README summarises the script in one table. This version of it fills in the details from the script itself.
| Keys | What they do |
|---|---|
| Caps Lock | Escape, handy in Vim |
| Caps Lock + ` | Turn Caps Lock on or off |
| Caps Lock + H J K L | Vim-style arrow keys |
| Caps Lock + W B | One word right, one word left |
| Caps Lock + U I O P | Page Up, Home, End, Page Down |
| Caps Lock + N M , . | Delete: Ctrl+Backspace, Backspace, Delete, Ctrl+Delete |
| Caps Lock + Z X C V A Y | Ctrl+Z, X, C, V, A, Y: the usual Windows editing shortcuts |
| Caps Lock + arrow keys | Move the mouse pointer |
| Caps Lock + Enter | Mouse click |
| Caps Lock + F1 – F6 | Mute, volume down, volume up, play or pause, next track, stop |
| Caps Lock + Q S | Window and tab control |
| Caps Lock + ; ' [ ] | Convenience mappings |
| Caps Lock + D F E R T | Frequently used programs, chosen by the user |
| Caps Lock + 1 – 5 | Visual Studio shortcuts, chosen by the user |
| Caps Lock + 6 7 8 9 0 - = | The shifted symbols, as if Shift were held |
The README gives no installation steps. The repository holds the script in two forms:
CapsLock.ahk, runs with AutoHotkey. It uses AutoHotkey v1
syntax.CapsLock.exe, runs without AutoHotkey.CapsLock.exe is an old, unsigned, 32-bit prebuilt binary. It has not been
tested on current Windows. If you want to try the layout, read the source
and run it with AutoHotkey v1 instead.
All of the Windows version is in
win/ in the repository.
| File | What it is |
|---|---|
CapsLock.ahk | The AutoHotkey source |
CapsLock.exe | The prebuilt executable, 207,868 bytes |
README.md | The original summary |
The SHA-256 of CapsLock.exe in the repository is
e0d6a4d2de155860aed164281ed16f5871aaca95cccc6fe1d46db2b16004cb80.